

The Irreplaceable Poncho
When I went into the Army as a Military Policeman in 1982, I was issued half a tent, otherwise called “a shelter half”. When I asked what I was supposed to do with half a tent I was told, “Find a buddy that has a matching half.” Together we made a whole tent. When I went into the Maryland Army National Guard some years later – in a Light Infantry unit – I wasn’t even issued half a tent. I was issued two ponchos, one poncho liner and one sleeping bag. When I asked about shelter I was told to make a “hooch” out of a poncho. Then I was told that the sleeping back was optional in the field. “Fight light; freeze at night.” Oh, joy…
 But I was intrigued at the same time. A “hooch”? That wasn’t anything I’d learned during my first term of service. What I was taught – first night out – was how to set up a single poncho so as to be unobtrusive, sufficient shelter from precipitation, and not a sail if the wind kicked up. Ever since then I’ve always kept a poncho tightly rolled or folded in my pack anytime I’m heading out hiking, camping, etc. Below I’m going to review several general utility uses for the poncho (besides the obvious rain protection) and how to use one as an emergency shelter.
Now, any sports fan who has ever been at a stadium when the rain started knows exactly what an “emergency poncho” is. It’s a piece of shaped plastic so thin you can see through it and even though it keeps the rain off your skin, it still FEELS like your skin is getting wet. The military issue poncho was a little better… and a little worse. Made of nylon, it was a little bit thicker than those cheap emergency models, but because it was woven it tended to let rain through where it touched you. Campers are familiar with what I mean. Just like inside a tent: if you touch the tent wall in a rain storm, you provide a spot for water to come through. Further, if you didn’t treat your tent properly with a water repellant, you may find yourself enjoying (being sarcastic there) more water than you wanted.
 So, while the military issue poncho was certainly a great thing to have, it helped if you did a few things with it. First, keep it clean. Once it gets wet, it will mildew unless you open it up and let it dry completely. Second, treat it with a quality water repellant and let that fully dry before folding or rolling your poncho. Third, if you rip it, DON’T try to sew it for a repair. That seam somehow always finds a way to attract water and is never sewed as tightly as you think it is. This is one of those times when duct tape really does fix everything. Put one piece on the inside and another on the outside. Naturally, if you’re in a forested or woodland environment, it helps to use green “100 mph” tape on the outside.
Now that we have a serviceable poncho, how many uses can we find for it. Plenty since it will take an awful lot of abuse and not complain (provided you do those three things listed above). For the hunter, it serves as a drag mat for pulling your trophy back to your vehicle. For the hiker it serves well to keep you dry in the unexpected rain shower. For the camper it can serve as a sleeping mat to keep you from sleeping directly on the ground. Where I think the poncho really shines is as an emergency shelter.
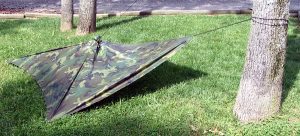
The two ponchoes I was issued by the infantry were both prepped the same way for storage in my ruck. The hood strings were pulled as tight as I could get them so that I had plenty of string hanging out and a really small hole. Then I folded the hood material over and wrapped it around that hole before wrapping the strings around that to tie it shut. What I ended up with was a water-tight hood opening now serving as the tie-center for my emergency shelter. With the poncho thus prepared, I could use two or three small aluminum or plastic tent stakes and two or three pieces of 550 cord (or bungees) to create my “hooch”.
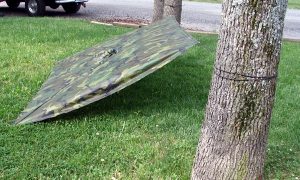 The hooch, when properly set up, is no higher than your knees. It’s not meant to give you lots of room. It’s meant to give you something to get under to stay dry, a little out of any wind that might exist, and (most importantly) an unobtrusive appearance because – well – noticeable shelters can be a bad thing in the combat field. To get your hooch just right, start by selecting your spot. A flat space might seem ideal, but water puddles in flat areas (because nothing is perfectly flat). So, find a spot that is relatively smooth with just a slight incline to it. You want to set up your hooch with the intention of having your head pointing UP the incline and your feet pointed down.
On both “top” corners, strethc the poncho out and put in your tent stakes. On one of the “bottom” corners, put in a tent stake (if you want). Whatever corners you haven’t staked down, attach 550 cord and tie them off to close trees or bushes. Remember to tie them low – you should have to low-crawl into your hooch. Finally, attach some 550 cord to the hood knot and tie that off to a close tree or bush just higher than your other corner tie-offs. What you get is a low shelter that will run off light rain and redirect water flowing down the incline around your sleeping space.
A few years back at Ft. AP Hill in Virginia, I saw a squad of guys put all their ponchoes together to build a fair sized hooch. It was a little taller than I’d been taught (about waist high) but it had plenty of room underneath and they were quite comfortable. Such a structure has to be carefully planned so that the overlaps of ponchoes all direct water flow to the outside edges in the event of rain, and no one guy is sleeping under the poncho that is steadily filling with water and will eventually collapse onto him.
So, the poncho can definitely be used for more than one purpose. It’s fairly compact when folded / rolled, and doesn’t stick out like a sore thumb in the woods. You can find them online or at virtually any surplus store. Add one to your kit today.